본 포스팅은 안드로이드 스튜디오에서 FCM(Firebase Cloud Messsaging)를 사용하기 위한 방법을 설명합니다.
보다 자세한 내용은 https://firebase.google.com/docs/cloud-messaging?hl=ko를 참조해주시기 바랍니다.
FCM(Firebase Cloud Messaging)
파이어 베이스 클라우드 메시징은 메시지를 안정적으로 전송할 수 있는 크로스 플랫폼 메시징 솔루션입니다.
FCM을 사용하여 클라이언트 앱에 메시지를 전송하여 사용자를 유지하고
재참여를 유도할 수 있습니다. 메시지는 최대 4KB의 페이로드를 클라이언트
앱에 전송할 수 있습니다.
주요 기능
- 알림 메시지 또는 데이터 메시지 전송
- 다양한 메시지 타겟팅
- 클라이언트 앱에서 메시지 전송
Android에서 FCM(Firebase Cloud Messaging) 앱 설정
본격적으로 시작하기에 앞서 FCM을 사용하기 위해선 아래의 요구사항을 충족하는지 확인합니다.
요구사항
- Android Studio를 최신 버전으로 업데이트합니다.
- API 수준 16(Jelly Bean) 이상
- Gradle 4.1 이상
- com.android.tools.build:gradle v3.2.1 이상
- compileSdkVersion 28 이상
요구사항이 충족되었다면 FCM 앱 설정을 시작하도록 하겠습니다.
Firebase 프로젝트 만들기
Android 앱에서 Firebase를 사용하려면 먼저 Android 앱에 연결할 Firabase 프로젝트를 만들어야 합니다.
보다 자세한 내용은 아래의 링크를 참조해주세요.
firebase.google.com/docs/android/setup?hl=ko
Android 프로젝트에 Firebase 추가
기본 요건 Android 프로젝트가 준비되지 않았다면 빠른 시작 샘플 중 하나를 다운로드하여 Firebase 제품을 사용해 볼 수 있습니다. 다음 옵션 중 하나를 사용하여 Android 앱을 Firebase에 연결할 수 있
firebase.google.com
- Firebase Console에서 프로젝트 추가를 클릭한 후 프로젝트 이름을 입력합니다.
- Google 에널리틱스의 사용 설정하고 계속을 누릅니다.
- Google 에널리틱스를 사용한다면 Google 애널리틱스의 계정을 선택하는 화면이 나오고 그렇지 않으면 프로젝트 추가가 완료됩니다.
Firebase 프로젝트에 앱 등록
위의 Firebase 프로젝트를 추가하셨다면 이제 Firebase 프로젝트와 자기가 만든 클라이언트 앱을 연결시켜주는 세 가지 작업이 필요합니다.
- Firebase 프로젝트에 앱 등록
- 클라이언트 앱에 Firebase 구성 파일 추가
- 클라이언트 앱에 Firebase SDK 추가
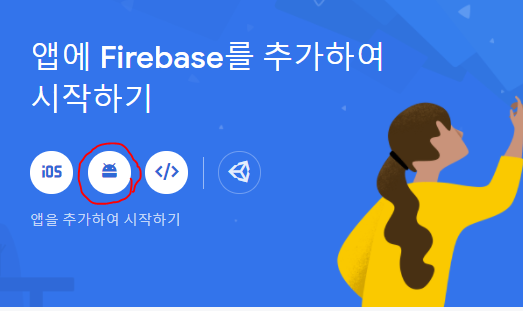
Firebase에 앱 등록
1. Firebase Console로 이동합니다.
2. 앱을 등록할 Firebase 프로젝트를 들어간 후 페이지 중앙에 위치한 Android 아이콘을 클릭합니다.
3. Android 패키지 이름을 입력합니다. Anroid 패키지 이름은 build.gradle(앱 수준)에서 applicationId로 확인할 수 있습니다.

4. 선택 사항들을 입력한 후 google-services.json을 다운로드하고 나머지 남은 두 단계를 진행합니다.
클라이언트 앱에 Firebase 구성 파일 추가
1. Firebase 앱 등록 단계에서 받은 google-services.json 파일을 앱의 모듈 디렉토리로 이동합니다. 위의 사진에서 google-services.json의 위치를 확인하실 수 있습니다.
2. 앱에서 Firebase 제품을 사용할 수 있도록 google-services 플러그인을 Gradle 파일에 추가합니다. Gradle 파일에 추가하는 작업은 루트 수준(프로젝트 수준)의 build.gradle과 모듈 수준(앱 수준)의 build.gradle에 추가합니다.
a. 루트 수준(프로젝트 수준) : dependencies 안에 코드를 추가합니다.

b. 모듈 수준(앱 수준) : apply plugin~ 의 코드를 추가합니다.(제일 아래쪽)

클라이언트 앱에 Firebasae SDK 추가
모듈 수준(앱 수준)의 build.gradle 파일 안에 dependencies 안에 implementation을 추가하고 동기화를 진행합니다.
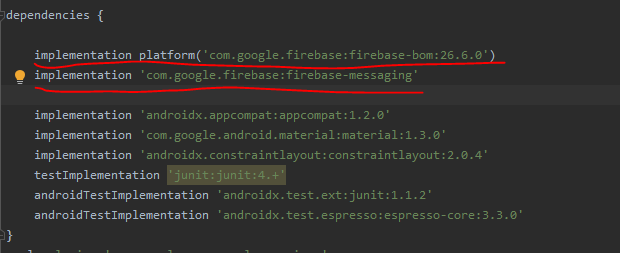
추가적으로 Google 애널리틱스 기능을 사용하시는 분께서는 아래의 코드를 추가합니다.

여기까지 완료되었으면 준비가 끝났습니다. 이상이 있으신 분께서는 댓글을 남겨주시거나
3firebase.google.com/docs/cloud-messaging/android/client?hl=ko 를 참고해주시기 바랍니다.
앱에 푸시 메시지 전송하기
앱에 푸쉬 메시지를 전송하기 위해서는 크게 아래의 세 단계를 진행합니다.
- Manifest.xml 수정
- MyFirebaseInstanceIDService 클래스 작성
- MyFirebaseMessagingService 클래스 작성
Manifest.xml 수정
MyFirebaseInstanceIDService, MyFirebaseMessagingService를 확장하는 서비스를 추가합니다. 앱이 실행될 때 토큰을 가져오고 백그라운드와 포그라운드에서 메시지를 수신받기 위해 필요합니다.
        <service
            android:name=".MyFirebaseMessagingService">
            <intent-filter>
                <action android:name="com.google.firebase.MESSAGING_EVENT"/>
            </intent-filter>
        </service>

        <service
            android:name=".MyFirebaseInstanceIDService">
            <intent-filter>
                <action android:name="com.google.firebase.INSTANCE_ID_EVENT"/>
            </intent-filter>
        </service>
android:name에서 오류가 나도 놀라지 마세요. 클래스를 작성하면 없어집니다.
MyFirebaseInstanceIDService 클래스 작성
앱이 실행될 때 토큰을 가져오기 위한 클래스를 작성합니다.
import android.util.Log;

import com.google.firebase.iid.FirebaseInstanceId;
import com.google.firebase.iid.FirebaseInstanceIdService;

public class MyFirebaseInstanceIDService extends FirebaseInstanceIdService {

    private static final String TAG = "MyFirebaseIIDService";
    @Override
    public void onTokenRefresh() {
        // Get updated InstanceID token.
        String refreshedToken = FirebaseInstanceId.getInstance().getToken();
        Log.d(TAG, "Refreshed token: " + refreshedToken);

        // If you want to send messages to this application instance or
        // manage this apps subscriptions on the server side, send the
        // Instance ID token to your app server.
        sendRegistrationToServer(refreshedToken);
    }

    private void sendRegistrationToServer(String refreshedToken) {
    }
}
    @Override
    protected void onCreate(Bundle savedInstanceState) {
        super.onCreate(savedInstanceState);

        MyFirebaseInstanceIDService service = new MyFirebaseInstanceIDService();
        service.onTokenRefresh();
    }
MyFirebaseMessagingService 클래스 작성
onMessageReceivce를 통해 메시지 수신을 감지하고 sendNotification 을 통해 화면에 알림을 띄우게 됩니다.
import android.app.NotificationChannel;
import android.app.NotificationManager;
import android.app.PendingIntent;
import android.content.Context;
import android.content.Intent;
import android.media.RingtoneManager;
import android.net.Uri;
import android.os.Build;
import android.util.Log;

import androidx.core.app.NotificationCompat;

import com.google.firebase.messaging.FirebaseMessagingService;
import com.google.firebase.messaging.RemoteMessage;

public class MyFirebaseMessagingService extends FirebaseMessagingService {
    private static final String TAG = "MyFirebaseMsgService";
    @Override
    public void onMessageReceived(RemoteMessage remoteMessage) {
        Log.d(TAG, "From: " + remoteMessage.getFrom());
        if (remoteMessage.getData().size() > 0) {
            Log.d(TAG, "Message data payload: " + remoteMessage.getData());
            if (/* Check if data needs to be processed by long running job */ true) {// For long-running tasks (10 seconds or more) use Firebase Job Dispatcher.
            } else {
                // Handle message within 10 seconds
                handleNow();
            }
        }
        if (remoteMessage.getNotification() != null) {
            Log.d(TAG, "Message Notification Body: " + remoteMessage.getNotification().getBody());
            sendNotification(remoteMessage.getNotification().getBody());
        }
    }

    /**
     * Handle time allotted to BroadcastReceivers.
     */
    private void handleNow() {
        Log.d(TAG, "Short lived task is done.");
    }

    /**
     * Create and show a simple notification containing the received FCM message.
     *
     * @param messageBody FCM message body received.
     */
    private void sendNotification(String messageBody) {

        Intent intent = new Intent(this, MainActivity.class);

        intent.addFlags(Intent.FLAG_ACTIVITY_CLEAR_TOP);

        PendingIntent pendingIntent = PendingIntent.getActivity(this, 0, intent, PendingIntent.FLAG_ONE_SHOT);

        String channelId = getString(R.string.default_notification_channel_id);
        Uri defaultSoundUri = RingtoneManager.getDefaultUri(RingtoneManager.TYPE_NOTIFICATION);

        NotificationCompat.Builder notificationBuilder =
                new NotificationCompat.Builder(this, channelId)
                        .setSmallIcon(R.mipmap.ic_launcher)
                        .setContentTitle("FCM Message")
                        .setContentText(messageBody)
                        .setAutoCancel(true)
                        .setSound(defaultSoundUri)
                        .setContentIntent(pendingIntent);

        NotificationManager notificationManager = (NotificationManager) getSystemService(Context.NOTIFICATION_SERVICE);

        if (Build.VERSION.SDK_INT >= Build.VERSION_CODES.O) {
            String channelName = getString(R.string.default_notification_channel_name);
            NotificationChannel channel = new NotificationChannel(channelId, channelName, NotificationManager.IMPORTANCE_HIGH);
            notificationManager.createNotificationChannel(channel);
        }
        notificationManager.notify(0, notificationBuilder.build());
      }
}
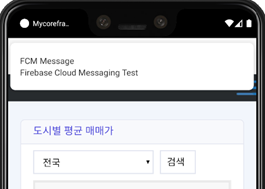
테스트 메세지 보내기
위의 과정이 모두 완료되었다면 Firebase 프로젝트의 알림 작성기를 사용하여 앱에 메시지를 보낼 수 있습니다.

Firebase 프로젝트의 알림 작성기를 통해 메시지를 보내게 되면 앱에 발급된 토큰을 통해 모든 앱 사용자에게 메시지를 보낼 수 있습니다. 만약 특정 사용자에게 메세지를 보내고 싶으면 구글에서 안내하는 가이드를 참고해주세요.
+ 추후 주제로 메시지 전송과 서버를 통해 메세지 전송하는 방법을 추가적으로 작성할 예정입니다.
1. 새 알림 또는 Send your first message 클릭
2. 알림 제목과 알림 텍스트를 입력한 후 테스트 메시지 전송 클릭 또는 다음 단계(타깃)에서 패키지를 선택하여 메시지 보내기 가능)
3. FCM 등록 토큰을 입력한 후 테스트 클릭

+ 토큰은 안드로이드 스튜디오의 콘솔 창에서 확인할 수 있습니다.


2021.03.24 - [Android] - [Android] FCM(Firebase Cloud Messaging) 주제 메시징
[Android] FCM(Firebase Cloud Messaging) 주제 메시징
본 포스팅은 FCM(Firebase Cloud Messaging)의 주제 구독 및 주제로 메시지 보내는 방법을 설명합니다. 기본적인 앱 설정과 테스트 메시지 전송은 앞선 포스팅을 참조해주세요. 2021.03.24 - [Android] - [Android.
hyunipad.tistory.com
2021.03.25 - [Android] - [Android] FCM(Firebase Cloud Message) 서버에서 메시지 보내기
[Android] FCM(Firebase Cloud Message) 서버에서 메시지 보내기
본 포스팅은 주제 메시지를 기반으로 한 서버 구현 방법을 설명합니다. 기본적은 앱 설정과 주제 메세징은 이전 포스팅을 참조해주시기 바랍니다. 2021.03.24 - [Android] - [Android] FCM(Firebase Cloud Messagi
hyunipad.tistory.com
'Programming > Android' 카테고리의 다른 글
| [Android] FCM(Firebase Cloud Message) 서버에서 메시지 보내기 (0) | 2021.03.25 |
|---|---|
| [Android] FCM(Firebase Cloud Messaging) 주제 메시징 (0) | 2021.03.24 |


댓글